Strong wrists are less about brute force and more about control. The practical answer to how to strengthen wrists is to train the joint from several angles, load it gradually, and make the forearm muscles and tendons tolerate work without getting irritated. That matters whether you are pressing, punching, grappling, hanging, carrying, or simply trying to keep your hands comfortable through long training weeks.
What matters most before you load the wrists
- Train flexion, extension, rotation, and support, not just wrist curls.
- Use light to moderate resistance first, then add load only when the motion stays smooth.
- Two to four short sessions per week is enough for most people.
- Grip work helps, but the wrist extensors and rotators are what keep the joint balanced.
- Sharp pain, swelling, numbness, or pain after a recent injury needs a closer look.
Why wrist strength matters more than most people think
I treat the wrist as a transfer point. It sits between the hand and the forearm, so if it collapses, the force you create elsewhere leaks out before it reaches the bag, the bar, or the floor. That is why weak wrists show up in very practical ways: push-ups feel unstable, bench pressing stalls, front-rack positions feel awkward, and heavy pulling or gripping work starts to fatigue the hands early.
For combat sports, the stakes are even clearer. A wrist that folds on impact wastes energy and can irritate the joint fast. For lifters, the problem is usually not a lack of chest or shoulder strength, but an inability to keep the hand stacked over the forearm under load. In both cases, the goal is not just bigger forearms. It is a wrist that can resist unwanted movement and still move well when you need it to.
That is why the best training plan starts with controlled motion, then adds endurance, then adds load. The next step is choosing the right angles to train.
Build it from four angles, not one
I like to organize wrist work into four buckets. This keeps the routine balanced and stops people from doing endless curls while ignoring the rest of the joint. Each piece matters for a slightly different reason, and the best programs usually include at least one drill from each category.
| Training angle | What it improves | Starter dose | Common mistake |
|---|---|---|---|
| Flexion and extension | Basic wrist bending strength and tendon tolerance | 2-3 sets of 10-15 controlled reps | Using momentum or too much weight |
| Pronation and supination | Forearm rotation and joint control | 2-3 sets of 8-12 reps per side | Moving from the shoulder instead of the forearm |
| Support holds | Ability to resist collapse under load | 3-4 holds of 20-40 seconds | Holding longer before position is stable |
| Grip work | Overall hand endurance and carry strength | 2-4 sets of 15-30 seconds or 10-20 squeezes | Training grip while the wrist is already fatigued |
The point of this setup is simple: motion builds capacity, rotation builds control, holds build stability, and grip work ties the whole chain together. If you only train one of those, you usually hit a ceiling fast. When the pieces are combined, the wrist becomes much harder to irritate in normal training.
Exercises that build real wrist strength
If I had to keep only a few drills, I would choose the ones below because they are measurable, easy to progress, and useful for both functional fitness and combat sports. The key is to keep the movement strict and the load honest. A sloppy light exercise is not better than a clean moderate one.
Wrist flexion and extension
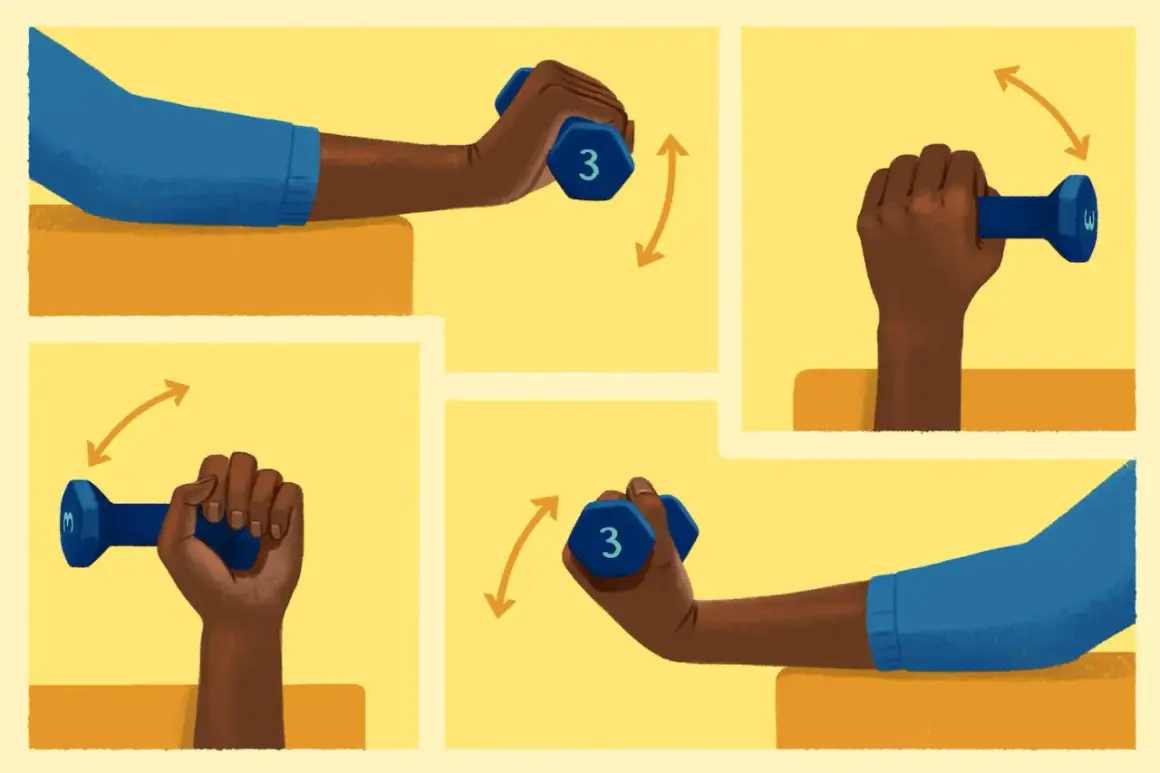
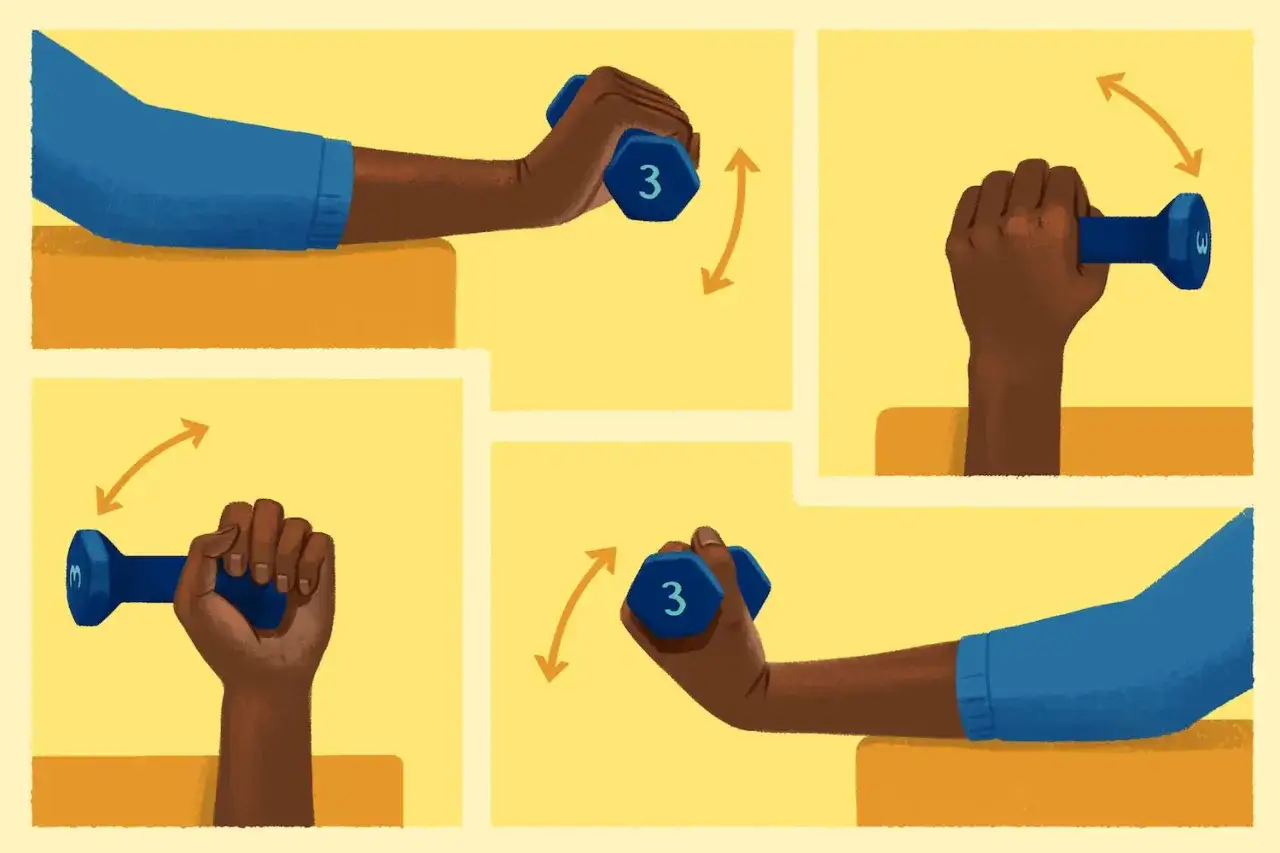
These are the classic wrist curl and reverse wrist curl patterns. Rest your forearm on a bench or thigh, let the hand hang off the edge, and move only at the wrist. Start light enough that you can lower the weight slowly for 2 to 3 seconds.
I usually program 2 to 3 sets of 10 to 15 reps for each direction. Extension work deserves as much attention as flexion, because many people already live in a flexion-dominant position during typing, gripping, and lifting. If you skip the extensors, the wrist often feels strong for a while and then becomes cranky later.
Pronation and supination
This is the rotational work that turns the palm down and up. A hammer, short dumbbell, or cable handle works well because the lever gives the forearm something real to control. Keep the elbow tucked, rotate slowly, and stop before the shoulder starts helping.
This drill matters for grapplers, racket athletes, and anyone who uses tools, bars, or handles under fatigue. It is also the kind of work that looks small on paper but pays off when the wrist has to stay coordinated rather than just strong. I like 2 to 3 sets of 8 to 12 reps per side.
Side-to-side control
Radial and ulnar deviation are the small side-to-side motions that people ignore until the wrist starts feeling unstable. A light hammer or dumbbell can train this angle by tilting the hand toward the thumb side and pinky side in a very controlled range.
This is not flashy work, but it fills in gaps that direct wrist curls miss. If your training includes punching, pressing, or catching awkward loads, this kind of control work can make the joint feel less fragile. Keep the volume modest, around 2 sets of 10 to 15 reps, and keep the range smooth.
Read Also: Toned Arms for Women - Real Results, No Gimmicks
Support holds and carries
Static work is where many athletes finally learn to own their wrists. Farmer carries, kettlebell rack holds, plank variations on the fists, and push-up handles all teach the wrist to resist collapse instead of just move. That is a different skill, and in my experience it is one of the fastest ways to make the wrist feel sturdier in actual training.Use holds of 20 to 40 seconds and stop before the wrist starts wobbling. A hold that breaks down early teaches bad positions. A clean hold teaches the joint to stay stacked under pressure, which is exactly what most people want in the gym or on the mat.
How I would program wrist work into a training week
The most useful wrist training plan is usually shorter than people expect. Two to four sessions per week is plenty for most athletes, especially if they already deadlift, pull, do kettlebell work, or spend time on the heavy bag. I prefer small doses that can be repeated consistently over a huge session that leaves the wrists irritated for days.
| Day | Focus | Example work |
|---|---|---|
| Day 1 | Motion | Wrist flexion 2x12, reverse wrist curl 2x12, pronation/supination 2x10 each side |
| Day 2 | Stability | Farmer carry 3x30 seconds, fist plank 3x20 seconds, side-to-side control 2x12 |
| Day 3 | Endurance | Light grip squeezes 2x20, rack hold 3x20 seconds, slow wrist extension 2x15 |
A simple rule works well here: add reps before you add load. If the movement stays smooth for two or three weeks, increase the weight a little. If the wrist feels sore in a deep, achy way the next day, reduce either the load or the total volume. The wrist usually responds better to gradual accumulation than to heroic sessions.
If you already get a lot of gripping from deadlifts, pull-ups, climbing, gi work, or bag rounds, you may need less direct volume than you think. In that case, I would keep the direct wrist work short and use the rest of the training week to let the joint absorb the adaptation.
What usually goes wrong and slows progress
- Only doing wrist curls. That builds one motion, not a complete wrist.
- Skipping the extensors. This often leaves the wrist stronger in one direction and crankier overall.
- Using too much weight too early. The exercise stops being useful when the body starts cheating the rep.
- Training through sharp pain. Muscular effort is fine, but sharp joint pain is a different signal.
- Ignoring rotation and support. A wrist that cannot resist twisting or collapse will still fail under real-world loading.
- Stacking too much grip fatigue. Heavy pulling, punching, and wrist work all on the same day can be too much for some people.
The biggest mistake I see is people assuming that discomfort automatically means progress. With wrists, that is a bad bet. Mild effort, clean form, and steady progression usually work better than chasing a burn. That matters even more when the goal is sport performance rather than just a forearm pump.
What changes for boxers, grapplers, and lifters
Different athletes need the wrist for different jobs, so the program should reflect that. A boxer needs aligned impact transfer. A grappler needs the ability to clamp, pull, and rotate under fatigue. A lifter needs support in pressing and front-rack positions. The same tissue is involved, but the demand is not identical.
| Athlete | Priority | Best emphasis |
|---|---|---|
| Boxer | Impact alignment and stability | Support holds, reverse wrist work, light bag work with clean wrist position, and hand wraps that stay snug without cutting circulation |
| Grappler | Support grip and rotational control | Pronation/supination, towel holds, carries, and static gripping under fatigue |
| Lifter | Pressing and rack stability | Wrist extension strength, front-rack tolerance, push-up variations, and loaded carries |
| General fitness athlete | Joint resilience and comfort | Balanced motion work, light grip training, and short support holds |
I also want to be direct about wraps and braces. They can help with position and comfort, especially in boxing, but they do not replace real strength. If the wrist only feels good when it is taped up, the underlying control work still needs attention.
That is why the best wrist plan is specific to the sport, but still built on the same base: motion, rotation, support, and gradual load. Once that base is in place, the warning signs become easier to spot.
When wrist weakness is a warning sign
Not every weak or painful wrist should be trained harder. If the issue started after a fall, a bad punch, a sudden twist, or a heavy lift that felt wrong, I would treat it as a possible injury first, not a conditioning problem. Sharp pain, swelling, visible deformity, numbness, tingling, popping with pain, or a clear loss of range of motion are all reasons to stop and get assessed.
The same caution applies if the pain keeps returning even after you cut back on load, or if everyday tasks like opening jars, pushing off a chair, or carrying groceries keep provoking symptoms. In that case, wrist strengthening alone may not be enough until the underlying issue is identified. Training should build tolerance, not disguise a problem that needs attention.
As a rule, if a movement feels unstable in a way that is clearly different from normal training fatigue, I would back off. A joint that is irritated today usually trains better tomorrow if you respect it now.
The starter plan I would use first
- Day 1, after a warm-up: wrist flexion 2x12, reverse wrist curl 2x12, pronation/supination 2x10 each side.
- Day 2 or 3: farmer carry 3x30 seconds, fist plank or handle plank 3x20 seconds, side-to-side control 2x12.
- Optional finisher: light grip squeezes 2x15 to 20, but only if the wrist still feels fresh.
- Progress by adding reps first, then a little load, while keeping the motion smooth.
If you want durable wrists, the formula is boring in the best way: train them from multiple angles, keep the loads modest at first, and respect pain signals. Do that consistently and the wrists usually become steadier in the gym, more reliable on the bag, and less fragile in everyday training.